Scalability and High Availability
Three Approaches to Deploy a Web Application with PostGIS, Flask, and Nginx
This guide presents three increasingly robust methods to deploy a web application using Flask (backend), PostGIS (spatial database), and Nginx (HTTP server).
1. Simple Deployment with Docker Compose
Objective:
Run Flask, PostGIS, and Nginx services in Docker containers without load balancing.
Structure:
docker-compose.ymlapp/→ Flask codenginx/→ Nginx configurationdb/→ PostGIS (official image)
Key Points:
- Easy to set up.
- Suitable for development environments and small applications.
Example docker-compose.yml:
version: '3.8'

services:
  flask:
    build:
      context: ./app
      dockerfile: Dockerfile
    container_name: flask
    environment:
      - DB_HOST=postgis
      - DB_NAME=gisdb
      - DB_USER=gisuser
      - DB_PASSWORD=gispassword
      - DB_PORT=5432
    depends_on:
      - postgis
    networks:
      - app-network
    restart: unless-stopped
    deploy:
      replicas: 3  # 3 Flask instances for load distribution
    healthcheck:
      test: ["CMD", "curl", "-f", "http://localhost:5000/points"]
      interval: 30s
      timeout: 10s
      retries: 3

  postgis:
    image: postgis/postgis:15-3.4
    container_name: postgis
    environment:
      - POSTGRES_DB=gisdb
      - POSTGRES_USER=gisuser
      - POSTGRES_PASSWORD=gispassword
    volumes:
      - postgis-data:/var/lib/postgresql/data
    networks:
      - app-network
    restart: unless-stopped

  nginx:
    build:
      context: ./nginx
      dockerfile: Dockerfile
    container_name: nginx
    ports:
      - "80:80"
    depends_on:
      - flask
    networks:
      - app-network
    restart: unless-stopped

networks:
  app-network:
    driver: bridge

volumes:
  postgis-data:
This simple approach runs one service per container. You can configure Docker to add 3 Flask services to handle increasing demand.
When testing this approach (without service duplication, i.e., a single Flask container) with a testing tool like Locust, you’ll observe system resource saturation and the appearance of request failures.
We simulated a load of 3 users arriving per second on a Flask API supporting GET and POST requests. This allowed adding points to a PostGIS database or listing points. These are relatively simple queries but can pose challenges for a server as the number of users increases. The basic approach (without replication) handles up to 200 users well, with 95% of requests responding in under 1,000 ms.
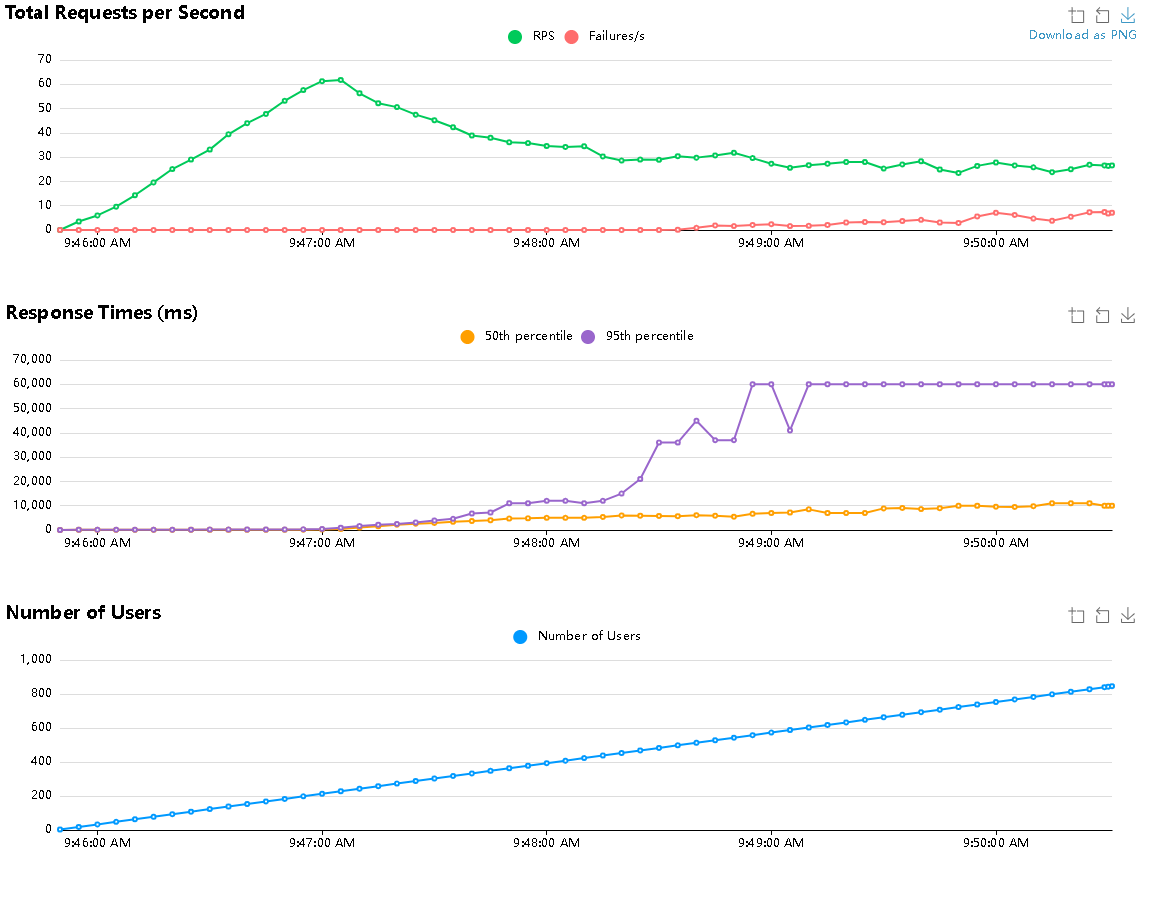
When adding the service duplication option with deploy.replicas, a slight improvement is observed. The application will still saturate, but this happens after 300 users (95% of requests under 1,000 ms response time). Additionally, no failures occur even when the application is saturated.
This approach is suitable for small applications.
2. Adding HAProxy for Load Balancing
Objective:
Instead of using Nginx as a proxy, use HAProxy (High Availability Proxy), a highly performant and widely used load balancer, especially in production environments, to distribute load across multiple instances of a web service.
We rely on 3 Flask containers as described above. Instead of Nginx distributing the load, we configure HAProxy in leastconn mode, meaning requests are sent to the container with the least traffic. Note that there are many load balancing strategies; some allow directing the same user to the same container to leverage cached operations, while others are more random or simply sequential, sending requests to the next container each time.
Modifications:
- Multiple Flask containers (
flask1,flask2, …). - HAProxy placed in front to dispatch requests.
- Still using
docker-compose.
New Service in docker-compose.yml:
haproxy:
  build:
    context: ./haproxy
    dockerfile: Dockerfile
  container_name: haproxy
  ports:
    - "80:80"  # Bind port 80 to host
  depends_on:
    - flask
  networks:
    - app-network
  restart: unless-stopped
Define a Dockerfile:
FROM haproxy:2.8
COPY haproxy.cfg /usr/local/etc/haproxy/haproxy.cfg
EXPOSE 80
Configuration in haproxy.cfg:
global
    log /dev/log local0
    maxconn 10000
    tune.ssl.default-dh-param 2048
    nbthread 4

defaults
    log global
    mode http
    option httplog
    timeout connect 5000
    timeout client 30000
    timeout server 30000
    option forwardfor
    option http-server-close
    maxconn 5000

frontend http_front
    bind *:80
    default_backend flask_backend
    log /dev/log local0 debug

backend flask_backend
    balance leastconn
    option httpchk GET /status
    http-check expect status 200
    server flask1 flask:5000 check inter 5000 rise 3 fall 5
    server flask2 flask:5000 check inter 5000 rise 3 fall 5
    server flask3 flask:5000 check inter 5000 rise 3 fall 5
HAProxy checks the containers for each request and routes to the least busy one.
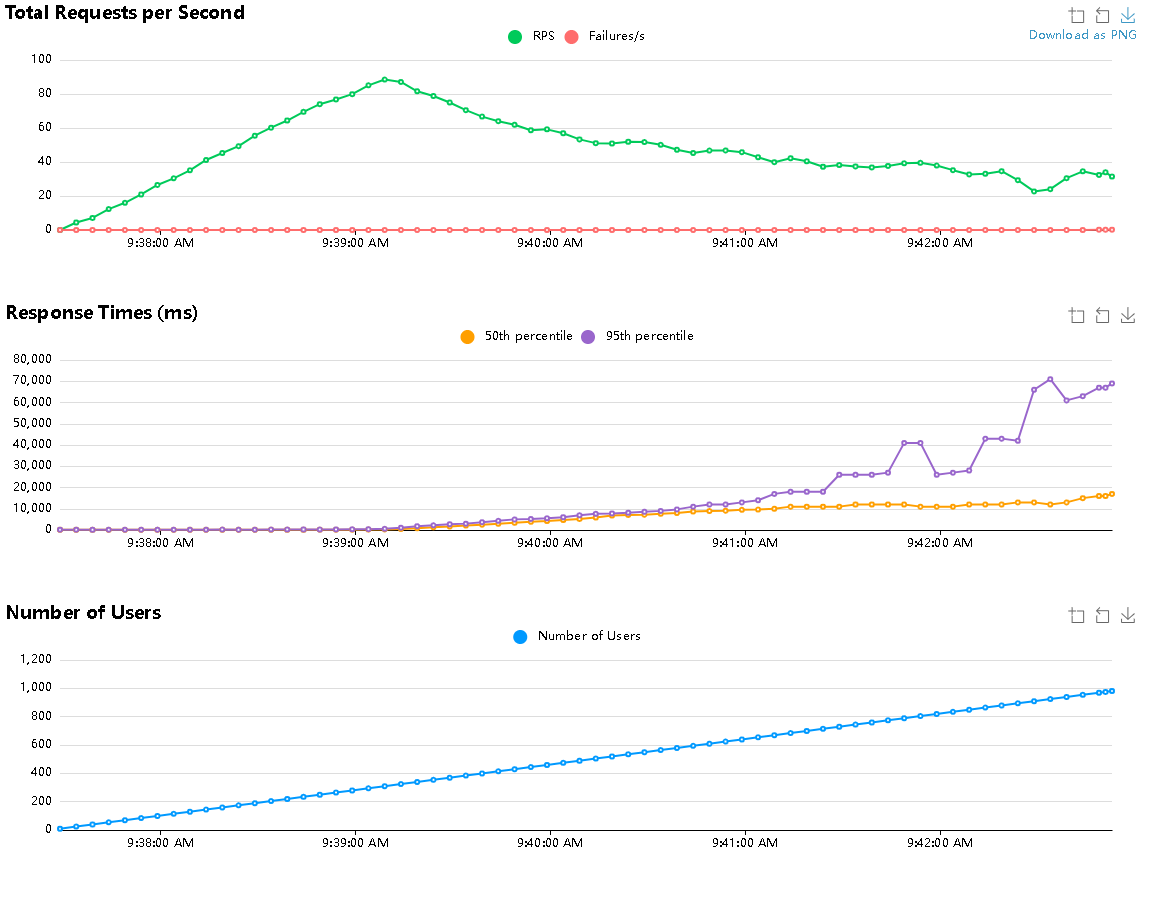
This approach yields interesting results, as instead of saturating around 200 users, the application performs well up to 300 users, with 95% of requests responding in under 1,000 ms.
This approach integrates well with an application already defined with a docker-compose.yml, simply replacing Nginx with HAProxy.
3. Deployment with MicroK8s (Kubernetes)
Objective:
For a higher level of robustness, consider a solution like MicroK8s, a lightweight and simplified version of Kubernetes.
This operates in a different ecosystem, so the application requires its own configurations and commands.
Installation
An installation process is required. This assumes you have a Debian-based system with Docker already installed.
Step 1: Update the System and Install Dependencies
Update the system and install essential tools needed for MicroK8s.
sudo apt update && sudo apt upgrade -y
sudo apt install -y curl wget git apt-transport-https ca-certificates gnupg lsb-release software-properties-common
Step 2: Install Snapd
Install and enable Snapd, required to install MicroK8s via Snap.
sudo apt install -y snapd
sudo systemctl enable --now snapd
Step 3: Install MicroK8s
Install MicroK8s with Snap using the --classic option for full system access.
sudo snap install microk8s --classic
Note: This operation may fail due to an outdated version of snap. You can update Snap by running:
sudo snap install snapd
Step 4: Configure User Permissions
Add the current user to the microk8s group to run MicroK8s commands without sudo, and activate group membership.
sudo usermod -a -G microk8s $USER
newgrp microk8s
Step 5: Enable MicroK8s Add-ons
Enable essential add-ons to support DNS, Ingress, storage, Helm, dashboard, and MetalLB for load balancing.
microk8s enable dns ingress storage helm dashboard metallb
- Benefits:
dns: Provides internal DNS resolution.ingress: Enables Ingress for external HTTP routing.storage: Configures persistent storage.helm: Installs Helm for managing Kubernetes applications.dashboard: Provides the Kubernetes web interface.metallb: Offers load balancing for services.
Step 6: Verify the MicroK8s Cluster
Check the status of the MicroK8s cluster and ensure all components are operational.
microk8s status --wait-ready
microk8s kubectl get nodes
microk8s kubectl get pods -A
Step 7: Build and Import the Flask Application Image
Navigate to the application directory, build the Flask Docker image, and import it into MicroK8s.
cd kubernetes-k8s/app/
docker build -t my-flask-app:latest .
docker save my-flask-app:latest | microk8s ctr image import -
Step 8: Deploy the Application with Helm
Create configuration files (Chart.yaml, values.yaml, templates/deployment.yaml, templates/ingress.yaml, templates/service.yaml) for each component.
For example, for the Flask component:
values.yaml:
replicaCount: 3

image:
  repository: my-flask-app
  tag: latest
  pullPolicy: IfNotPresent

service:
  type: ClusterIP
  port: 5000

ingress:
  enabled: true
  hosts:
    - host: flask.local
      paths:
        - path: /
          pathType: Prefix
Chart.yaml:
apiVersion: v2
name: flask-app
description: A Helm chart for deploying a Flask application
version: 0.1.0
appVersion: "1.0"
templates/deployment.yaml:
apiVersion: apps/v1
kind: Deployment
metadata:
  name: -flask
  labels:
    app: flask
spec:
  replicas:
  selector:
    matchLabels:
      app: flask
  template:
    metadata:
      labels:
        app: flask
    spec:
      containers:
        - name: flask
          image: :
          imagePullPolicy:
          ports:
            - containerPort: 5000
          env:
            - name: DB_HOST
              value: "postgis-service.default.svc.cluster.local"
            - name: DB_NAME
              value: "gisdb"
            - name: DB_USER
              value: "gisuser"
            - name: DB_PASS
              value: "gispassword"
            - name: DB_PORT
              value: "5432"
templates/ingress.yaml:
apiVersion: networking.k8s.io/v1
kind: Ingress
metadata:
  name: -flask
  annotations:
    nginx.ingress.kubernetes.io/rewrite-target: /
spec:
  rules:
    - host:
      http:
        paths:
          - path:
            pathType:
            backend:
              service:
                name: -flask
                port:
                  number:
templates/service.yaml:
apiVersion: v1
kind: Service
metadata:
  name: -flask
spec:
  selector:
    app: flask
  ports:
    - protocol: TCP
      port:
      targetPort: 5000
  type:
Then navigate to the Helm charts directory and deploy the PostGIS, Flask, and Nginx components with Helm.
cd ../helm/
microk8s helm3 install postgis-release postgis/
microk8s helm3 install flask-release flask-app/
microk8s helm3 install nginx-release nginx/
Step 9: Initialize the PostGIS Database
If the database needs to be created, access the PostGIS pod to create a geospatial table for storing points.
microk8s kubectl exec -it $(microk8s kubectl get pod -l app=postgis -o jsonpath="{.items[0].metadata.name}") -- psql -U gisuser -d gisdb
In the psql interface, run:
CREATE EXTENSION postgis;
CREATE TABLE points (id SERIAL PRIMARY KEY, name VARCHAR(100), geom GEOMETRY(POINT, 4326));
Step 10: Test the Application
Verify the application by sending HTTP requests to the Flask endpoint via the Ingress.
curl -X POST http://flask.local/point -H "Content-Type: application/json" -d '{"longitude": 2.3522, "latitude": 48.8566, "name": "Paris"}'
curl http://flask.local/points
Step 11: Monitor and Debug
Check pod status, logs, and services to ensure everything is running correctly.
microk8s kubectl get pods
microk8s kubectl get svc
microk8s kubectl logs <flask-pod-name>
microk8s kubectl logs <nginx-pod-name>
Step 12: Update the Flask Application (Optional)
If changes are needed, update the Helm chart values and redeploy.
nano helm/flask-app/values.yaml
microk8s helm3 upgrade flask-release helm/flask-app/
Step 13: Clean Up MicroK8s
Uninstall Helm releases, disable add-ons, and stop MicroK8s if switching to another setup.
microk8s helm uninstall flask-release
microk8s helm uninstall postgis-release
microk8s helm uninstall nginx-release
microk8s disable metallb
microk8s disable ingress
microk8s stop
Architecture:
The MicroK8s solution relies on Docker container images. Simply build the image and instruct MicroK8s to use it.
- Deployments: Flask, PostGIS, Nginx
- Services: ClusterIP + Ingress
- Replicas: Configurable
- PersistentVolume for PostGIS
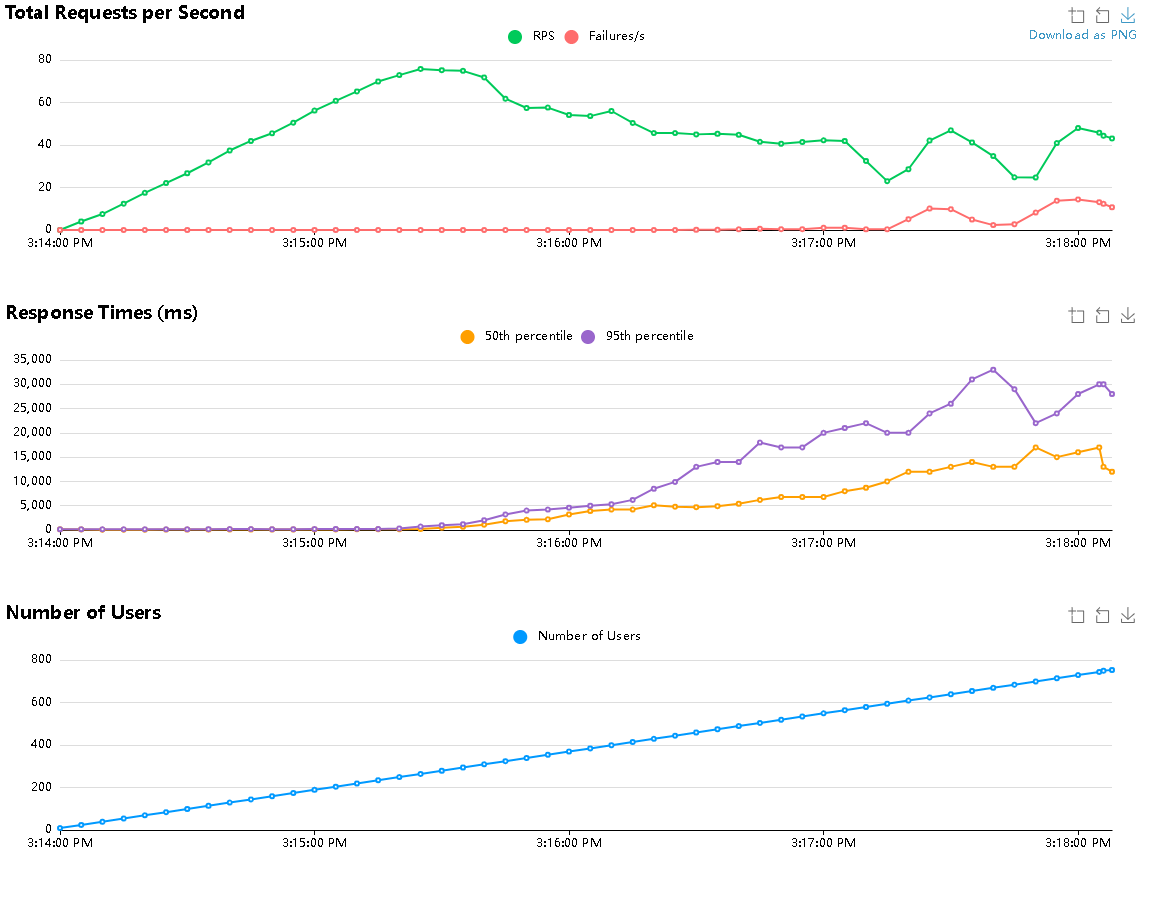
Using this approach yields interesting results. The server saturates around 300 users, but no failures occur. The server continues to respond, though response times increase as more users are added.

Response times are significantly lower than those achieved with other solutions, suggesting that a well-tuned software and hardware configuration could yield excellent results with this approach. The main drawback is the need to thoroughly master MicroK8s, including all configuration files and commands.
Hardware Configuration
All tests were conducted on the same server, so resources remained consistent (16 GB RAM and 6 vCPUs). To achieve a high-performing application, you could increase the number of processors and memory.
Moreover, application sizing heavily depends on needs and users. All presented solutions could easily meet the demands of an application with 50 users performing multiple operations simultaneously. To ensure the solution meets expectations, it’s advisable to simulate load tests with Locust, identifying frequently performed or resource-intensive operations.